Friday, August 30, 2013

The Golden Goddess Skirt

Creating the Golden Goddess Skirt


Okay, so this is the first adult-sized project.  I made a few oopsies. But I think everything will turn out in the end. 

Although I wanted to finish the skirt while my Sweet Sistah was still in town, I realized it might be better to get it mostly done, fit it on her, mark adjustments, and put on the final details when she comes in town before the wedding.  That's my story, and I'm sticking to it.

Drafting the Pattern

First, I took measurements, and using the chart in Sew What? Skirts! drafted the pattern on graph paper.  I like to use graph paper because it is sturdy (which is good when you're cutting the fabric), and it's easy to see whether your seams are trued and your lines are straight.

However, it is not good for "tissue fitting" your pattern (i.e,, when you pin the pattern pieces together on the body to check fit and make adjustments).  More on this later.

I had a bit of trouble with one aspect of the pattern drafting.  I curved the bottom hem to match the curve in the waistband, but then couldn't true the side seam line--it just wouldn't work the way the instructions said it would.

I think A-line skirts are easier to draft.

So, I fudged it a little bit.

Cutting the Fabric

Before cutting, I just wanted to eyeball the fit--here is where pattern tissue paper would have been better.

Oh, no! it looks too narrow!  Maybe I didn't add enough ease? 

Sweet Sistah wanted it fitted, not loose, so where it said "add 2-4 inches of ease," (hip measurement) I added 2.  Where it said "add 1-2 inches of ease," (waist measurement) I added 1. 

[I partly made this decision based on the results of The Cotton Candy Skirt.  Although I had intended a fitted waistband, the amount of ease suggested in the pattern drafting instructions made it too large, so I had to use elastic.]

Since the pattern looked so small, I decided to add an additional 1/2 inch seam allowance at the side when cutting the fabric--a total of 2 inches around.  I didn't want to do a lot of work only to have it not fit at all!

{Basting Darts--
Golden Goddess Skirt}

Basting the Darts


The first sewing task was to baste and sew the darts. 


My Mom had given me some tips over the phone:

  • While basting the darts, take one stitch on one side of the dart leg--from the top towards the point--then cross to the other side, continuing in the same direction, and take another stitch. 

  • Keep alternating sides with each stitch.

  •  When you get to the point, pull the thread taut--magic!  a perfectly formed dart.

{Basting Darts--Golden Goddess Skirt}


No need to try to fold slippery fabric and pin!


  •  Now, just sew from top to bottom of the dart (on the inside of course), making sure to sew off the edge of the fabric at the point. 


{Basting Darts--Golden Goddess Skirt
Here you see where I like to add a pointed tab at the top of the dart
instead of closing it while cutting the fabric.  Now I can simply trim
away the extra fabric to match the contour of the waist.}
  • Remove the basting threads.


Voila--simple, perfect, beautiful darts!


{Basting Darts--The Golden Goddess Skirt. 
The dart still looks a bit puckered, since I machine basted but
haven't sewn final stitches or pressed yet.}
It's fun to see how cloth takes shape with a few simple stitches!

Basting the Side Seams

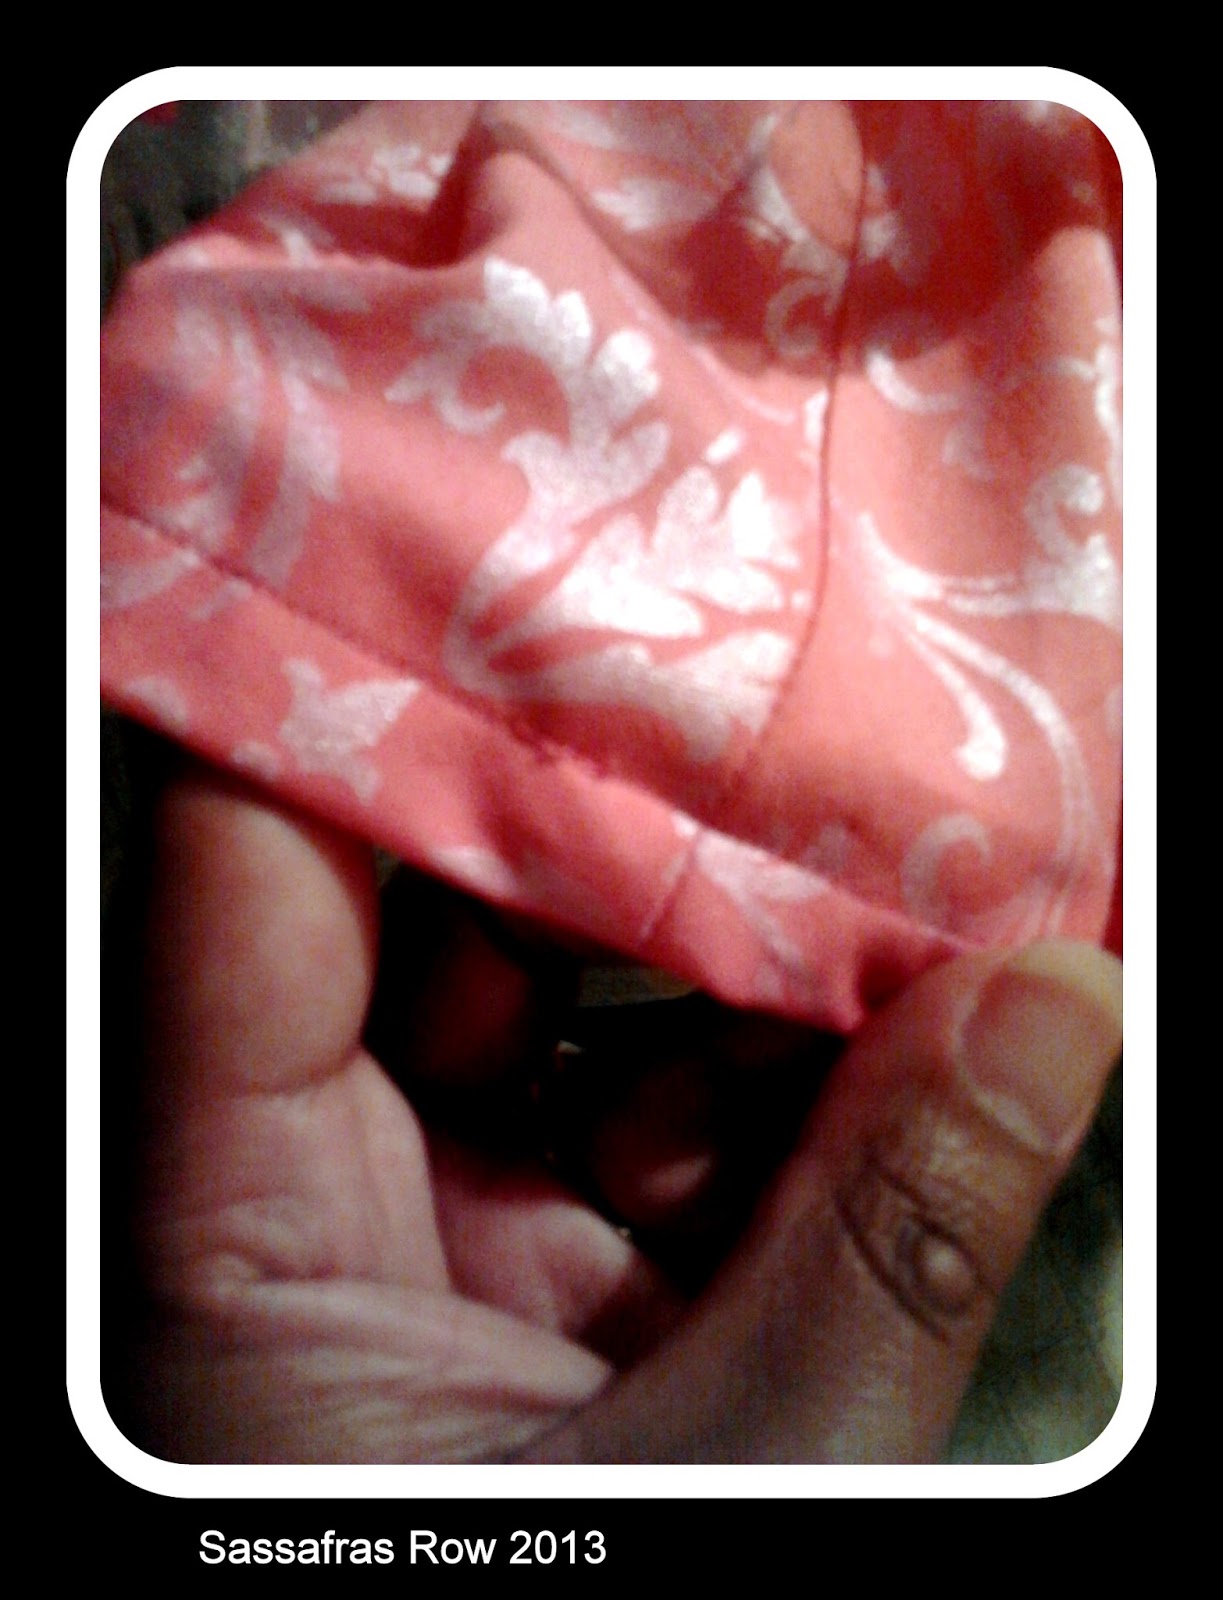
Now, I simply basted the side seams, and gave the skirt to Sweet Sistah to try on.

{Golden Goddess Skirt:
Basted Side Seam}


WTF!  IT'S LIKE FOUR INCHES TOO BIG EVERYWHERE!

So much for the pattern looking too small.


We held the skirt in place, and I pinned on both sides where the seams should have been.

I removed the skirt and roughly marked the pin line with fabric marker.  (Well, I'm calling it fabric marker; it's really just cheap kid's washable marker--it washes out super easily!)


{Golden Goddess Skirt:
Basted Side Seam with Adjustment Marked}


Then, I traced roughly along those lines with marker.  In theory, I should be able to just re-baste along those lines, right?

Maybe.  Or, possibly, wrong!!

The problem is, if I do that I won't be able to use the paper pattern for cutting the overskirt.  Also, because of the pinning and marking, the distance between the original seam line and the new seam line may not be identical on both sides.

Maybe I shouldn't be so particular?  I know it will fit, at least. 

But maybe it will end up looking lopsided?  What if the distance between the seams and darts are not symmetrical across all four quadrants of the body?


{The Golden Goddess Skirt:
Sudden Dart/Fitting Angst.  This photo is appropriately F-d up!}

This is what Sweet Sistah said would happen.  It would come out lopsided, but I (and now everyone) would feel obligated to wear it anyway. 

These were supposed to be special, hand-created garments, gifts, to be worn proudly!

CRAP I hate it when naysayers are actually right!

On the other hand, if I do simply re-baste and pull out the original basted seams, then I can use the skirt itself as the pattern for the overskirt.

Or, even better, since the overskirt is supposed to be a bit wider than the underskirt--kind of a floaty, sheer, layer--maybe all I have to do is measure the new waistline after I've adjusted the skirt, and gradually connect the new waistline to the old hipline on the paper pattern.

I'm a genius!

It's amazing how writing about something suddenly solves all of its problems.

All week, I've been trying to figure this out.  I had at least three more-complicated ways of figuring this out.  Since I couldn't face it, I set it aside.

Now, instead of having three skirts finished in a week, as I had planned, I only have one slightly messed-up one, that's still not finished.

But now I know how to fix it!


{Golden Goddess Skirt:  As I pinned out the excess, I also fitted the skirt more like a pencil skirt than like a straight skirt, since I thought it would be more flattering.  Here you can see how the contour moves closer to the body at the knee.}


Till next time,--Ayana


Tuesday, August 27, 2013

Beautiful Fabric!

We went Fabric shopping!

My Sister, Little Miss, and my Friend from the Wedding Dress Shop went to find fabric for bridesmaids' skirts.  It was brilliant to all go together, so we could compare colors, textures, and find what suited all of us.

Little Miss has a frighteningly good eye for fashion.  I received a lot of design tips for my own dress, which will match hers.

My sister nixed the gathered A-line shape with tulle overskirt--I thought that would be flattering for anyone, but she said not.  So I gave her some of my pattern books to leaf through.  She chose an elegant straight skirt style, modeled on this beautiful skirt from Sew What! Skirts. 

 
Straight skirt with contrast yoke
{Image from:  Sew What! Skirts, p. 86}


We'll call Sweet Sistah's version the Golden Goddess Skirt. 


 The underskirt fabric is shantung satin, shiny on one side and textured on the other, and the overskirt is a sparkly organza. 


It will be beautiful! 


 Color, Texture, and Sparkle


The wedding colors are gold and navy, to match the colors of The Pilot's uniform--


--and plum--one of my all-time favorites (virtually every shade of purple):


As you can see, I bought matching tulle anyway, "for decorations."  That was Sweet Sistah's idea.  She's the artistic one, so I'll let her figure that out.


My goal is to finish Sweet Sistah's skirt before she returns home, or at least have it cut and basted so I can evaluate the fit, and to finish the other two within a week. 

What do you think?  Can I do it?  (Well, I already know the answer to that one, unfortunately.)  So how's this for a question:  what are your favorite fabric colors and textures?

P.S.:  My sewing space is still a mess....


{I love how this photo makes it look like the sewing machine is about to careen off the table!}

Till next time,--Ayana


Saturday, August 24, 2013

Red is the new Color for Fall!

Yay, one of my favorites!  I love red. 

Check out these beautiful new patterns from Burda Style, showcasing the beauty of the color red.

Drool.  As soon as my wedding dress episode is over, I'll be making some of these fall clothes for winter. 

_use_me_large
{source}
Red is the new Color for Fall


Blouses.  Why don't people wear blouses anymore?  I'm a little tired of knit tops.  It's hard to find a good blouse that isn't designed for grandma.  But these Burda patterns are scrumptious.

That's it for today, readers.  I hope this post sparks some inspiration and creativity!

Till next time, --Ayana

Thursday, August 22, 2013

My Sewing Space

What does my sewing space look like?


Inspired by the beautiful spaces featured on Ellison Lane, I decided to share my space with all of you and join the link party.


My sewing space doubles as my kitchen table.  Originally, it was designed to pack up easily so we could have dinner.  All the fabric and notions for current projects could be easily folded, packed, or stored at a moment's notice into my improvised sewing box, and the sewing machine cover could be slipped on, and the whole thing slipped underneath the table.


 My favorite thing about my sewing space is my daughter's little sewing machine lined up near mine.  I jokingly call it "our little sweatshop."  Also, I love that the sewing happens pretty much in the hearth--the kitchen is the center of any house.  It feels more social to use this space, instead of being tucked away somewhere else.


But, sometimes I also want to relocate to my own private nook upstairs.

Fabric

What's on my sewing table at the moment?  A gorgeous sparkly gold organza fabric for the overskirt of my Sweet Sistah's bridesmaid skirt.  And a matching shantung satin for the underskirt. 


If you look closely, you'll find some other things, too. 


It's sort of like playing "Where's Waldo" except it's more like, "WHERE did I put that NEEDLE I just had in my hand?"


Organization Issues


Well, let me tell you readers, despite my best plans at organization, all my creative spaces end up looking like a serious mess after a while.  You think this is bad, you should see my office! 

For some reason I resist cleaning up while I'm still in the middle of a project.  So I just keep limping along with stuff piling up until I get sick of it and then go on a cleaning binge.

I know, I know.  I'm working on it. 

In the meantime, we eat outside in the beautiful weather on the deck.  It feels like a mini vacation.  Or, in the dining room.  Which is quickly becoming a temporary school work area.

We haven't had friends over for dinner in a while....

Till next time--, Ayana

Tuesday, August 20, 2013

Finally, Success! A Self-Drafted, Cotton Candy Skirt

Yay, Readers!  I did it!

What did I do?, you might ask.  I made a garment that is not only wearable, but, unlike the first Little Miss skirt, it turned out really great.  And, I drafted the pattern myself.  Now, I'm really on my way!

The Cotton Candy Skirt

So, how did this all come about?

First, I did some more experimenting with old t-shirts for fabric.  I used one old t-shirt to make an ultra-fitted skirt (built to Little Misses's own specifications), to wear to drama camp.  This gave me more experience with stretch knit fabrics. 

I used tissue underneath and on top of the fabric, and pinned my self-drafted pattern (which consisted of her exact measurements from waist to knees, with no wearing ease) carefully on top. 

Before removing the tissue, but after I unpinned the pattern pieces, I zigzag stitched the edges of the fabric all around to prevent the edges from rolling, twisting, and jumping around.  I tore off the tissue when done with this step.  I used tweezers to remove the tissue from under the stitching.

Then, I carefully pinned the front and back pieces together, sewed the side seams, added the elastic to the waist, and hemmed.  Voila, a decent skirt, though obviously homemade.

Then, I experimented with drafting an A-line version, using the instructions from Sew What? Skirts!, by Francesca DenHartog, which I had found in the library and read voraciously.  Other than the new shape, my sewing steps were identical to the previous skirt.

Finally, I decided to stop messing around with torn up old clothes as fabric.  I was going to do it right! 

I found a super sweet, bright pink cotton sateen with a light contrast fleur de lis like pattern at the fabric store. 


As I was walking past the remnants bin, I found a sheer fabric with an embroidered design similar to that on the main fabric!  And, there was just enough. So I snatched it up. 


{I placed some white fabric underneath so you can see the swirl in the sheer fabric}


I also found a bright pink velveteen ribbon for the waistband, and a matching, narrow, frilly ribbon to trim the hem.


 Pattern Manipulation

I took the A-line pattern I had drafted, retraced it, slashed it, and spread it to create a fuller A-line shape. 


I also decided to do all the sewing the right way, no shortcuts! 
I made sure to use the correct grain of the fabric ( I didn't even know what this meant when I first started out). 


Pressing Seams


I pressed to one side, then pressed open, turned under, and sewed my seam allowances.  What a difference this makes!  My seams are so neat and pretty!  It's not just idle work, people. 


Topstitching

I topstitched the waistband ribbon, and threaded the elastic through. 

(Previously, I had stitched the elastic to the top of the waistband on the right side, then turned under twice and stitched, with messy but functional results.) 


I basted the curved hem before pressing, turning it up twice and topstitching.  My topstitching is so neat, you can hardly see where it begins and ends! 


I had another sewing revelation--remove the darn arm table for greater control and paradoxically faster stitching.

Instead of hemming the sheer fabric, I finished it with the frilly ribbon, topstitching again.  This lets the sheer fabric hang down a little longer than the main fabric, and lets the frilly ribbon seem to "float" beneath. 


I thought the ribbon would be enough to prevent the sheer fabric from unraveling at the hem, but alas I needed to use some fray check for extra safety.  I then trimmed away any edges not covered by the ribbon.


 Little Miss LOVES this skirt, and so do I! 

Flower Girl Dress Design Inspiration

If only I had made it in cream instead of pink, it could have served as her flower girl skirt for the wedding.  Of course, she wants a dress that matches mine. 

I'll probably use the same skirt pattern, but use tulle as the sheer overlay, insert a zipper instead of the elastic, and trace a bodice from a sleeveless fancy dress she already owns.  Then, I'll add a waist sash in a contrasting color. 

In fact, I might do that before any further work on my own dress, so I can gain some more experience before cutting into my fancy fabric.  I had thought I would save hers for last, since she is growing, but I doubt she would actually outgrow an entire size in the next eight weeks.  Hmmm, let's see....


Readers, how did you reach your sewing Ah-hah moment?  What was your first favorite project?

Till next time,--Ayana

Sunday, August 18, 2013

Knitting with Stripes

I found a great idea today on Pinterest, for knitting stripes.  It's so simple, yet so appealing!


K1 P1 across on first row of each color..This would be a great way to use up a stash of yarn!
Knitting Stripes
{Original Source}

The basic idea is to alternate colors for any set number of rows that you wish.  But, on the row that you switch colors, you k1 p1 across the whole row.  All of the other rows are knit in basic stockinette stitch.  What I love about this is the texture created on the k1 p1 rows.  Simple! but Elegant!

Stash Busting

Knitting in stripes is a great way to bust your stash.  You may not have enough of any one yarn for a large project, but together many odds and ends yarns can be joined.  Or, you can mix an expensive yarn, "stretching it out" so to speak, by alternating with something more basic. 

This can also be a great way to use novelty yarns, which might be too much of a good thing for a large project, but would look elegant alternating with a background color.

Alternating Colors in Your Knitting

While I love the idea pictured above, I'm not as fond of the rainbow.  I prefer something a little less regular, or maybe a little more surprising.  Here's how you can get a more artistic effect.

1) Use the Golden Ratio.  1:2:3:5 


Color A: knit Row 1.  Color B:  knit Rows 2-3.  Color A: knit Rows 4-6.  Color C:  knit Rows 7-11

Continue this pattern, either keeping the same color scheme, or creating new ones while maintaining the same number of rows at each new color change.  This generates a sense of randomness that is still balanced.


2) Use the ratio of each color to the other(s). 


This works best when you have odd amounts of yarn. 

Let's say you have 4 oz. of Color A, 6 oz. of Color B, and 8 oz. of Color C.  (I just chose random, but easy-to-work-with numbers.)

For every 4 rows worked in Color A, work 6 rows in Color B, and 8 rows in Color C.

This can be broken up into smaller chunks, as long as the ratio remains the same.

For example.  If you want smaller repeats of color.  Color A:  knit Row 1-2.  Color B:  knit Rows 3-5.  Color C.  knit Rows 6-9

You could then alternate this with both larger and smaller repeats for variety.

The benefit of this method is that you will not run out of one color before you've finished the whole project.

Designing Knitting with Stripes

These ideas can be incorporated into any type of knitting project, from home decorating (throws, pillow covers) to garments (hats, sweaters, mittens, scarves, shawls).  If you are making a larger project, or a fitted garment, of course you have to be careful with gauge, yarn weight, and yardage.  However, if you are making a scarf or hat, feel free to experiment away!

For the time being, my knitting page is just about ideas.  After the wedding dress is finished, I can make knitting tutorials!  Yay!

Till next time,--Ayana

[Find me on Pinterest]

Matching Outfits!

Since the gathered skirt from my last post turned out so well for Amanda, I decided to use that experience to practice my new skills making people clothes!  I bought some more of the same black and white printed fabric and planned to make a skirt for Little Miss.  Then, she wanted me to have one also.  So, more fabric.

The version for Little Miss turned out well, but not as shaped as Amanda's.  After reviewing the tutorials I had used, I realized my mistake--I had only cut the fabric 1 1/2 times the waist measurement, not 1 1/2 times the hip measurement (or maybe it was 2 times the waist measurement?)!  Well, duh!  I'm not exactly sure anymore how I had measured Amanda's version since I had read so many different methods, and at the time I had no intention of blogging about it, but the proportions were definitely different.  But the version for Little Miss still fits, and looks pretty good.

Here are the two sweeties on the last day of school! 


(I also used the remainder of my pink t-shirt to make a matching tube top for Little Miss; there wasn't quite enough of it, so I used some scraps of my white fabric as a facing for the top, allowing it to peek through at the V-neck from the original t-shirt.)

Little Miss wanted me to have a matching skirt, so I decided to oblige.  However, I wanted to use this as an opportunity to test out a circle skirt.  I looked for tutorials on how to make a circle skirt.  However, I somehow messed up; first, it was too big in the waist, so I had to remove one or two of the panels from the skirt.  Now, it fit in the waist, but it was more like a 3/4 circle skirt. 

I had a really hard time attaching a curved waistband.  So, I wasn't looking forward to hemming the skirt.  I found Gertie's tutorial on how to use horsehair braid, but when I put the skirt on, I wasn't really happy with how the shape of the skirt looked on me.  Needless to say, I never hemmed it.  I felt like it actually emphasized my curvy backside.  Not in a flattering way.  Can anyone say, wadder?

However, I did discover that sewing a line of basting stitches would have helped me match the curves at the waistband; this is a technique I've since used in other places where I've had to turn up a slightly curved area--it's easier to turn up the fabric and press, using the stitching as a guide.

So, I learned a few things--the most important of which is that a circle skirt is out as a possible shape for my wedding dress.  I could try it in a drape-y-er (what's the right word here?) fabric, but don't really feel like revisiting this particular experiment.  I'll put it on my list for the future. 

One of the things I enjoy about sewing (but also sometimes the most frustrating aspect of it) is the learning curve.  It's fun to find or invent new ways of doing things, or turning mistakes into positives.  I actually enjoy the problem solving.

What about you, readers?  How do you cope with mistakes?  What are your favorite things about this craft?

Friday, August 16, 2013

How to Get Started

So, since I had never really sewn before, I decided I needed to start small.  Very small.  This was back in May; I figured I had plenty of time to fail or change my mind before deciding to go back to the wedding shop and buy one of the gowns I had tried on. 
 
My Friend from the wedding shop dressing room had emailed me the photos, which I forwarded to my mom, sister, and another friend.  There was no clear winner.  And, while it was fun to try those gowns on, the photos helped me see that I wasn't that ecstatic about how they looked from an outside perspective.
 
Back to my decision to make my own dress.  My mom thought I was crazy--"Why on earth would you want to do that!?" (I think she was kind of panicking).  

My sister actually said, "You'll just feel obligated to wear it, even when it comes out lopsided!"  (Seriously, did you really just say that?  but I did laugh, 'cause it was kind of funny.)  

didn't let them sway me, for the reasons I discussed in my first post.  But I realized I was taking a pretty big risk, so I didn't immediately throw all caution to the wind.
 
Instead, I marched to the nearest fabric store, a chain hobby shop which actually has quite a lot of fabric, mostly cotton prints (probably for quilting, but what do I know? nothing about quilting, that's for sure), and bought about a yard each of three different on-sale fabrics, and a spool of tulle.  I also found some fusible seam binding which I thought looked interesting, so I decided to try it out.  Oh, and some elastic.  And, some Velcro.  And, some hooks and eyes.  And what do you think I did? 
 
I measured my daughter's (let's just call her Little Miss) American Girl Doll (named Amanda) and started figuring out how to make skirts.  This is when I discovered sewing blogs. 

I mean, really, there's a whole 'nother world out there I never knew existed!  (Well, I guess you, lovely readers, are a part of this world, so you already know this.  For me, it was a huge revelation!) 

I learned so much from reading smart sewing blogs.  Every day I discovered another one.  I was so captivated by Gertie's New Blog for Better Sewing, I decided I needed to start from the beginning and get caught up to the present.  That only took about three months.  I have so many favorites that I can't really list them all here.  But these are the tutorials I used for learning how to make gathered skirts:  Gertie, Adventures in Dressmaking, and By Hand London.

I made three straight skirts:


Amanda's Straight Skirt #1
{This photo is not the best,
but it gives a sense of the fabric's color, sparkle,  and sheerness}


Amanda's Straight Skirt #2


{The third straight skirt is identical to the second, only longer, so I didn't include the photo here.}


a short gathered skirt:


and a tutu skirt:


Amanda's tutu skirt
{we're still finding glitter all over the house!}


and then I cut up an old t-shirt of mine and made a tube top.  That was an all-day effort, and then some.  But, I learned a lot about what works and what doesn't.  The short, gathered skirt I think came out the best. 

I was glad I had impulse-bought the seam tape, because at this point I really didn't remember how to use the sewing machine, and adding that on top of learning how to make a skirt (three, no less) would have been a little much. 

Also, it turns out that (other than the gathering stiches, and attaching the waistbands, which I did by hand) it was easier to manipulate the small pieces of fabric at the ironing board than it might have been at the sewing machine.  Plus, as inexperienced as I was, I think the seams and hems came out straighter than I could have done with a needle and thread.  The seam tape actually gave a nice firm edge to turn the fabric over for the hem, for example. 

I don't think I'll ever use that stuff on a garment for people, though.  That wouldn't really be "sewing," would it?  More like, "gluing."

Little Miss was so delighted!  I did all of this while she was at school, and didn't tell her about it, so it was a total surprise when she came home.  I never expected how much she would love those little skirts! 

Little Miss decided that Amanda was going on a date.  (I asked her, "how old is Amanda?  I thought she was just a baby!  At least, she was last week."  Apparently, Amanda was sixteen that day.)  I realized suddenly that those new little outfits expanded her play imagination opportunities A LOT.  And that made me really happy!

What do you think I did next, readers?  Next post I'll talk about how I turned those (admittedly still very) new skills into some people clothes.

I'm curious, readers, if you are sewists, how did you get started?  Was it intimidating, or did you charge right into it with confidence?  What inspired you, and what inspires you today?

I'm not honestly sure what led me to think I could undertake this project; I guess I just sort of knew it was the right thing for me, for no rational reason!

P.S.:  Although I plan to include tutorials in future posts, I'm not the best person to teach basic sewing skills, as I'm still learning myself.  One of my favorite go-to resources is Tilly's Learn to Sew resources on her awesome blog Tilly and the Buttons.  She starts from the very beginning--a very good place to start--with how to set up your sewing machine.  To me, that was one of the most intimidating parts.  Thankfully, my soon-to-be husband, The Pilot, knows how to sew and got it all set up for me.  (Sigh!  He can do everything.)

Till next time!--Ayana

Wednesday, August 14, 2013

Follow My Blog to Stay in the Loop

Follow">http://www.bloglovin.com/blog/10323651/?claim=y3syekhfdsy">  Follow my blog with Bloglovin

How to Get Creative!

What do you do if you want to be creative and make something special for your wedding day, but don't have time to sew a whole fancy dress?

When I first started on this creative journey, I had little to no sewing skills.  I hadn't touched a sewing machine in, oh, twenty years!  And the last thing I tried to make (a skirt from a commercial pattern) got me frustrated, so I never finished it.  I thought patterns were written in some kind of foreign language, so despite wanting to sew I never gave it another shot, until now.

I dusted off my mom's old sewing machine (which I'm embarrassed to say, I've had for about fifteen years now!), got it serviced, and started teaching myself!  We'll get back to that story in the next post.

But this post is about:  what if you have limited time/skills/patience, but still want to make something beautiful?  Consider making half a dress.

It is much easier to sew a gathered skirt than most people realize.  If your skills aren't up to making a fitted bodice, then why not find a beautiful fitted top and make a skirt to go with it?  If you want a more unified look, you can sew the two pieces together at the waist, or you can use a ribbon or satin sash to cover the waistband (or both).

Here's some inspiration:


This would be beautiful for a casual but elegant wedding, and could be more formal with a longer length (although that would require more body, and likely a petticoat to achieve the proper drape).
 
 
Here's a longer, more formal version:


{source}
note:  I have no experience with this seller.
 
 
You could pair a handmade tulle skirt with a fitted, strapless, corset, or bustier style top.  Wouldn't this one be lovely?:


Once you get creative, the possibilities are endless.
 
What fuels your creativity?


Monday, August 12, 2013

The Fun Part--Choosing a Style!

Today, we'll talk about some of the things you need to consider before you design your dress.  The most fun question is:  what is your style?
 
Spend some time figuring out what you like, and what looks best on you.  I recommend three ways to do this: 
 
1) Raid your closet. 

You probably already have everything you need to know!  Check out your favorite tops, skirts, and dresses to find any common themes. 

I realized that most of my favorite items have some sort of empire waist styling, and I tend to avoid very fitted skirts
 
2) Search online images and bridal collections. 

What types of fabrics, embellishments, and designs grab your attention?  Don't think too much about it--just bookmark your favorites, or pin them, so you can come back to them later.  Do you like lace, silk, tulle, ruching, gathering, peplum, A-line, mermaid, ball gown, tea length?  Embroidery, tiered skirts, applique? 


I discovered that I love flowing, floating designs, and ball gown skirts.  I also like tulle, contrast color waistbands, and lace.  I am open to embroidery and tasteful applique.  (Although, I have memories of tacky applique from eighth-grade home ec--yikes!)


3)  Ready to multiply the fun?  Try on some dresses! 

If you live near a major department store, you can do this easily without making an appointment or asking for a friend to come with you (although shopping with a friend is super fun--just sayin, some people don't like company in the dressing room).  You don't even have to shop in the bridal section, you can try on special occasion dresses with similar style lines. 

Or, you can go all out and try on gowns at bridal shops and boutiques.  You may walk away with your favorite dress in your price range, and save yourself lots of time, and end up feeling like a princess!  If you go this route, bring a friend who can take some photos for review later. 

 
{excuse the lack of hairdo/makeup}

Be prepared to be surprised!  I thought I would love the ball gown look, but after trying some on, there was just too much fabric for my petite height and curvy figure. 

So, what did I end up deciding?  The basic style lines of my design are:  strapless, empire waist bodice, gored A-line skirt with tulle overskirt.  I will attach a contrast waistband sash that curves up into the bodice. 

I may use a layer of lace over the bodice, and I may use some lace trim on the skirt.  If I find an embroidered tulle I like, that matches my contrast waistband, then I will skip the lace.  If I find some tasteful applique designs, and if I use lace, I may combine these on the bodice.  (Check out Claire's design at Errant Pear.)

Isn't this exciting?  Now you have an idea of what you want, and you can develop your design as you go.  You don't have to have everything set in stone. 

Some final questions to ask yourself:  How much time do you have?  We'll talk about how to figure this out, and some other creative options that don't involve a huge project, next time.

What do you think, readers?  What are your favorite style lines?

Happy designing!